Celery and Flask
The Celery documentation can be confusing. If you are building a flask app this article will hopefully boil down the process into a few steps that are easy to understand, and explicit in their instruction.
Lets automate!
Earlier this year I participated in building a web-application called SteamScout as a final project for the RMOTR advanced python course. The app allows users to track games on Steam and receive an email alert when the game's price drops below a certain point. Breaking this problem down made it apparent we'd have to automate a few things. We narrowed it down to two tasks:
- Updating the games database:
- Steam is constantly adding new games to their library. Scraping their games library at regular intervals would be necessary to keep our own games database current.
- Emailing a user if their selected game reached the specified price:
- This is actually two tasks in one. First we need to look at any games our users have added to their watch list, and check the current price of those games on the steam website. Then, if the price of the game is below the price threshold the user has indicated, we send them an email.
Enter Celery
We decided to use Celery to solve the two problems I mentioned above. If you're unfamiliar with celery, it's an asynchronous task queue written in python. It allows you to execute tasks in the background so your app can focus on doing other things.
Setting up a "Message Broker"
Celery requires a message broker to function. As tasks are created they are pushed onto a queue stored on the broker. When it's time for those tasks to be executed, they are popped off the queue. The "message broker" is just a database, and there are a couple of options to choose from:
- Redis
- This is what I used and what this article will focus on. If you're following along it's probably easiest to use this one. You can install redis by following the link or by running "pip install redis" from the command line.
- RabbitMQ
- Beanstalk
Once you have redis installed, open up a new terminal window and run "redis-server" to start it up. You should see this in your terminal window:
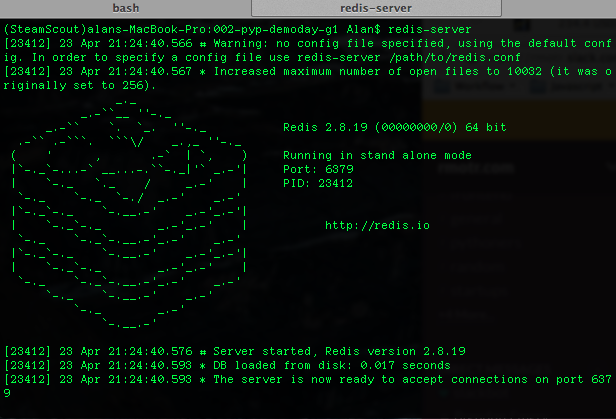
Note the port location: 6379. This will be important for when you configure the broker URL in your settings. Also note this is the address on your local machine only, and if you deploy to a platform this URL will be different.
Instantiating a Celery object
The next step in this process is to create a celery object. I called this object 'celery' for obvious reasons, and for the rest of the article the object will be refered to this way. If you use a different name, remember to substitute it in. Anyway, this part will look familiar to you if you've been using python for a little bit:
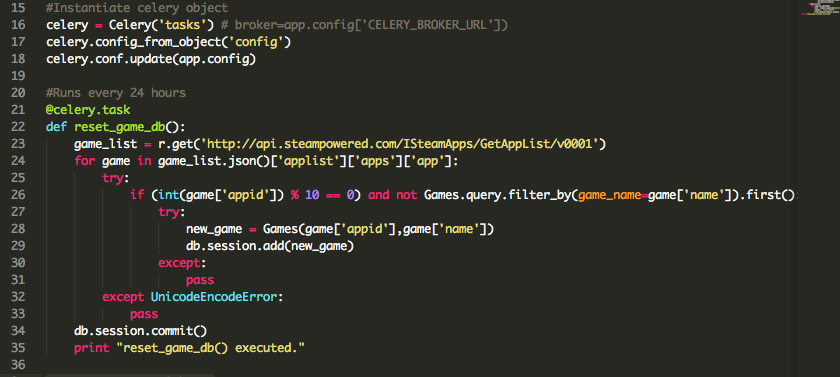
celery = Celery('tasks')
Steamscout had a separate config.py file where we had all the configurations for the app. The celery configurations were housed there as well. Routing those settings to the celery object is as simple as:
celery.config_from_object('config')
celery.conf.update(app.config)
And that's it! Now in the same file you can add the functions you want to run at regular intervals, and register them as tasks for celery using the decorator @celery.task. Here's what the file looks like for Steamscout:
Celery settings
Your celery object needs some configuration before it can go to work for you. In your settings file create the following:
- BROKER_URL = 'redis://localhost:6379/0'
- Remember when I said to note the port number for your redis server? There it is. This setting allows your celery object to connect to your message broker. Just remember that every time you want to run a celery worker you also need to run a redis server.
- CELERY_RESULT_BACKEND = 'redis://localhost:6479/0'
- This is for storing the results from the tasks celery is executing for you. Depending on what you're using celery for, you may not need this.
- CELERY_TASK_SERIALIZER = 'json'
- CELERYBEAT_SCHEDULE = {}
- This is where the magic happens. The CELERYBEAT setting is where you can designate when and how often you want your tasks to run. More detail on this setting in the next part.
Celerybeat
Here's the Steamscout celerybeat configuration:
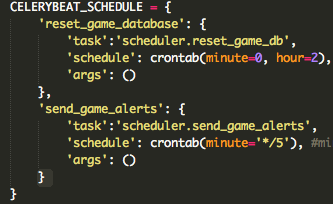
Lets break down whats happening here. Check out the first setting:
- 'reset_game_database'
- This name has no significance except for you and others reading your code. You can assign any name for your task, although it's probably a good idea to have the name reflect what the task does.
- 'task':'scheduler.reset_game_db'
- The 'task' is the function itself. The value for this key is of the format [file_name].[function_name]. In this instance, the file is "scheduler.py" and the function is "reset_game_db".
- 'schedule':crontab(minute=0, hour=2)
- The crontab is what actually keeps track of when your task is going to be executed. hour=2 indicates that this task will execute on the 2nd hour (out of 24, think military time) of every day. Go here and scroll down to "Crontab schedules" to see a more detailed list of the possible arguments you can use to set up a schedule. It's pretty flexible!
- 'args':()
- Now if the function which you've designated to be a celery task has any arguments, you'd put them here. reset_game_db() doesn't have any, so I left this blank.
Now all that's left is starting a worker.
Running a worker, starting a Beat
The documentation for celery instructs you to run the following command in a new terminal to launch your celery worker:
celery -A [file_with_celery_object] worker
When i did this however, I got an AttributeError saying 'Flask' object has no attribute 'user_options'. Why this occurred is beyond my knowledge, but I did find a fix. Rather than just specifying the file with your celery object, include the name of the celery object as well:
celery -A [file_with_celery_object].[celery_object_name] worker
In my case, this looked like celery -A scheduler.celery worker. If you've been following along, you should see something like this:
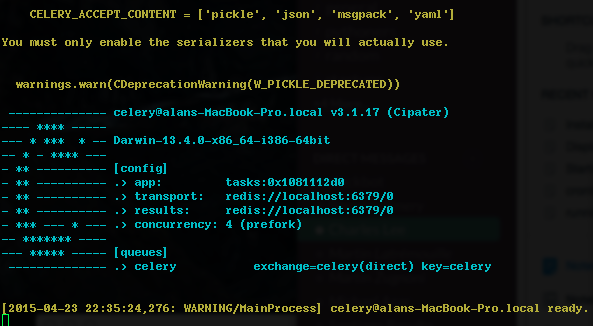
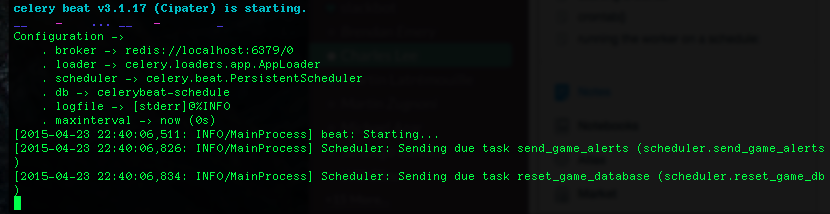
Now the last thing to do is run the celery beat, so that your worker can get assigned tasks at the interval you specified. In a separate terminal, run:
celery -A [file_with_celery_object].[celery_object_name] beat
If it worked, you'll see something like this:
Now if you look back at the window where your worker is running, you should see a timestamp for each function as it executes. I included a print statement for each task so that I could easily see which one was being executed. Here's what that looks like:

In conclusion
That's all it takes to set up Celery with a flask application. It's a powerful little tool that can be applied to much more than what I've demonstrated here, so be sure to experiment. TLDR coming soon!